Wednesday, August 7, 2013

Healthy Polenta Chips

Potato chips replacement!

Finally. Let's be honest here, you can not just stop with eating 1 chip.

Here is the healthier version of potato fries. Eat them by itself or eat them as a side with a juicy steak.

What you need:
- 2.5 cups of water
- 1 cup of polenta
- 1.5 tsp of chicken stock (powder preferred)
- 1 tsp of rosemary
- Salt to taste
- Olive oil spray

Ingredients needed
Note that you will need to prepare a aluminium lined dish/container/baking pan.
Here I used 20cmx20cm.


Step one:
Pour the water and chicken stock into a saucepan, let it boil.

Step two:
In thin steady stream, pour the polenta into the boiling water mix while stirring.
Not too fast because you do not want it to clog up in mix.

Steady Stream
Step three:
After the polenta mixture become thicker and mashy, sprinkle the rosemary evenly while stirring.


Step four: 
While it's still hot, pour the polenta mix to the aluminium lined tin and press it down. Make sure there are no bubbles. 
Set aside to cool and set.


Step Five:
When cool, take out polenta out of the tin and start on cutting them into pieces.
Here, I cut them into 6cm x 3cm x 0.7 cm


Step Six:
Preheat the oven on 180C.
Lay the pieces on baking paper lined tray and spray them with olive oil.
When finish, pop them into the oven for 20 minutes.

Step seven:
Take them out from the oven, let them cool for a bit and then enjoy!
Good to go with BBQ sauce or chilli sauce.


That's it for now!

Until next time,

Tania xx

Potato Skins with Blue Cheese

With the Ashes Test still going, I wonder what will be the best munchies to go with it?

POTATO SKINS!

Here I used both golden delight potato and red delight potato.
Pick golden delight potato if you want to be able to fit more fillings and crunchier skin.
Pick red delight potato if you want more of 'bite-size' potato skins, as they are available mostly in medium size (flatter compared to golden delight potatoes) and they have tender skins (which tends to curl when you bake them).

Red and Golden Delight potatoes
Potato skins is similar to pizza, you can throw anything in the fridge and you are good to go.
This time, I have leftover blue cheese. So, here we go!

What you will need:
- 1kg of potatoes
- Oil Spray
- 150g Chopped bacon
- 50-75g Blue Cheese
- 100g Mozzarella Cheese
- 100g Red Capsicum (or any other colour)
- a handful of chopped onion spring
- Jalapenos and chilli flakes (if you like it spicy)

Step one:
Preheat the oven on 180C
Wash the potatoes and put them in the oven for 45-50 minutes

Bake for 45 minutes
 Usually, while waiting, I will cook the bacon, chop the capsicum, jalapenos, and onion spring.

Cooked bacon

Step two:
Take them out and cut them in half, length wise.
Scoop the inside, leave about 5mm of potato. (Careful! They are hot!)

Scoop them out!
Step three:
Put the scooped potatoes skin-side up on the rack and spray them with the oil.
Put them back into the oven for 10 minutes.
After that, flip the potatoes over (skin side down), spray and pop them into the oven for 10 minutes.


Step four:
Put bacon, capsicum, jalapenos, cheeses on and put them back to the oven for 10 minutes.

Ready to be put into the oven
Step five:
Take them out of the oven and let them cool a bit.
I know you can't wait to eat them up, but believe me, hold your horses.
You can serve them with sour cream and sweet chilli.
But I like them as they are, the blue cheese give that enough saltiness that you don't have to add anymore flavour.
Do not forget to sprinkle the onion spring and they are ready to eat!

DONE!
Beer on your left hand, potato skins on your right, what more can you have..?
Enjoy!

That's it folks!

Until next time,

Tania xx

Friday, July 19, 2013

Doritos Crusted Chicken Breast

People usually go with cornflakes for that extra crunch with their kitchen.

BUT, why don't we use Doritos?
The good thing about this is you can go with your favourite Doritos flavour.

So, lets get to it!

What you need:
2 cups of buttermilk
2 cups of flour (plain or self raising, whatever you have at home)
5 eggs
300g Doritos
900g chicken breast (without skin and bones)
Cayenne Pepper/Chilli Flakes (Optional, Sprinkle on coasted chicken before baking)


Step 1:
Cut the Chicken breast 2.5cm cube or smaller.
Pour the buttermilk into the chicken and keep in the fridge for 2 hours.

Step 2:
While waiting, crush the doritos (you can do it inside the bag).
Tip: For finer texture, you can put them in a food processor.


Step 3:
After 2 hours, take out the chicken from the fridge.
Preheat your oven at 180C.
The routine is to coat the buttermilk-coated chicken with flour, and dip it into the egg and cover it with doritos.
Repeat the routine for all pieces of chicken.
Lay them on baking paper-lined tray.


Step 4 :
Bake the chicken for 15 minutes.
Tip: Do not forget to check the bigger piece of chicken, if they are cooked or not.


Step 5:
Serve while they are still hot with any sauce you like! Tomato, BBQ, mayonnaise, or your own homemade sauce!

ENJOY!

Until next time,


Tania xx

Healthy Homemade Kale Chips

I think it is safe for me to say that NO ONE can stop at only eating one chip when you have the whole packet in front of your eyes.

So lets make your own Kale Chips when you don't have to feel guilty if you can not stop eating them.

What you need:
1 Bunch of Kale
2 tsp of olive oil (Preferred olive oil spray)
Salt and pepper to taste


Steps 1:
Wash Kale leaves with water and dry them with paper towels. Make sure they are dry.
Tips: It is better to wash them while they still intact with the big stem and dry them after you cut the kale leaves into smaller pieces.

Steps 2:
Preheat oven at 170C.
Lay baking paper into a flat tray. Equally scatter the Kale leaves, do not overlay each other.
Spray olive oil and sprinkle salt and pepper into desired amount. (not too much!)


Step 3:
Pop them into the oven for 10 minutes. Every oven is different, so, take them out when the edges of the leaves turn into brown but still have green in the middle part.
Take them out and let it cool for a few minutes. Eat them while its hot!
Tip: Store them in airtight container.


DONE!
Now you can nibble on these Kale Chips without having to run miles to work on the calories!

Until next time,


Tania xx


Thursday, July 4, 2013

Kitchen Test: Strawberry and Watermelon Cake with Rose Cream

Welcome to my first ever Kitchen Test!

This is the place where I pick my favourite recipe and try it on. Sometimes I will change it a bit or change the ingredients according to the product availability here in Australia.

So, I've been a fan of Strawberry and Watermelon Cake from Black Star Pastry in Newtown and I am a bit excited when I found the recipe by Christoper The on Gourmet Traveller.

What you will need:

- 250 gm seedless watermelon, thinly and equally sliced
- 60 ml (1/4 cup) Rosewater (check out my DIY Rosewater)
- 4 tbsp Caster sugar
- 40 gm Almond meal
- 500 gm Strawberries, halved
- 12 seedless red grapes, halved
- 1 tbsp coarsely chopped pistachios


Almond Dacquoise

- 150gm almond, coarsely chopped
- 150gm Pure icing sugar, sieved
- 5 eggwhites
- 135gm caster sugar


Rose-scented Cream 

- 300 ml thickened cream
- 30 mg caster sugar
- 2 tbsp rosewater


We will make the Almond dacquoise first.
Preheat oven to 180C.
Process almonds in a food processor until finely ground, then combine in a bowl with icing sugar.
Whisk eggwhites with electric mixer until soft peak form, then gradually add caster sugar and whisk until stiff peaks form.
Gently fold through almond mixture.


Spread the mixture into equal sized oven tray (I used 20cmx30cm) lined with baking paper.


Bake until golden (10-15 minutes). Set aside to cool
Note: Originally, the mixture suppose to be spread into a bigger oven tray (eg: 30cmx40cm) and then cut half lengthways to make sure you have equal quality of dacquoise. However, because I used smaller sized tray, thus thicker layer, I lower the heat and let them stay in the oven for a longer period of time (180C for 25-30) so in the end you will have crispier dacquoise.


Now, lets go to the watermelon.
arrange the slices in a single layer on a wire rack. Sprinkle them with 20ml of the rosewater and then scatter with 2 tbsp of sugar. Stand to macerate approximately for 30 minutes and them pat with paper towel.


While waiting for both to be ready, lets do the rose-scented cream.
Whisk cream and sugar with an electric mixer until soft peaks form, gradually add rosewater and whisk until stiff peaks forms.
Do not over whisk, keep an eye on the texture!


Check on the dacquoise, if they are cool enough, lets get stacking!

1. Place 1 dacquoise for the base
2. Spread 1/3 of the rose-scented cream


3. Scatter half of the almond meal


4. Put the watermelon on top and trim to fill any gaps
5. Scatter the other half of the almond meal


6. Followed by 1/3 of the rose-scented cream
7. Place the other piece of dacquoise and


8. Spread the remaining cream left.


9. Refrigerate until firm (1-2 hours)

Combine strawberries, remaining rosewater and sugar in a bowl, mix them together.
Set aside to macerate for 15 minutes.


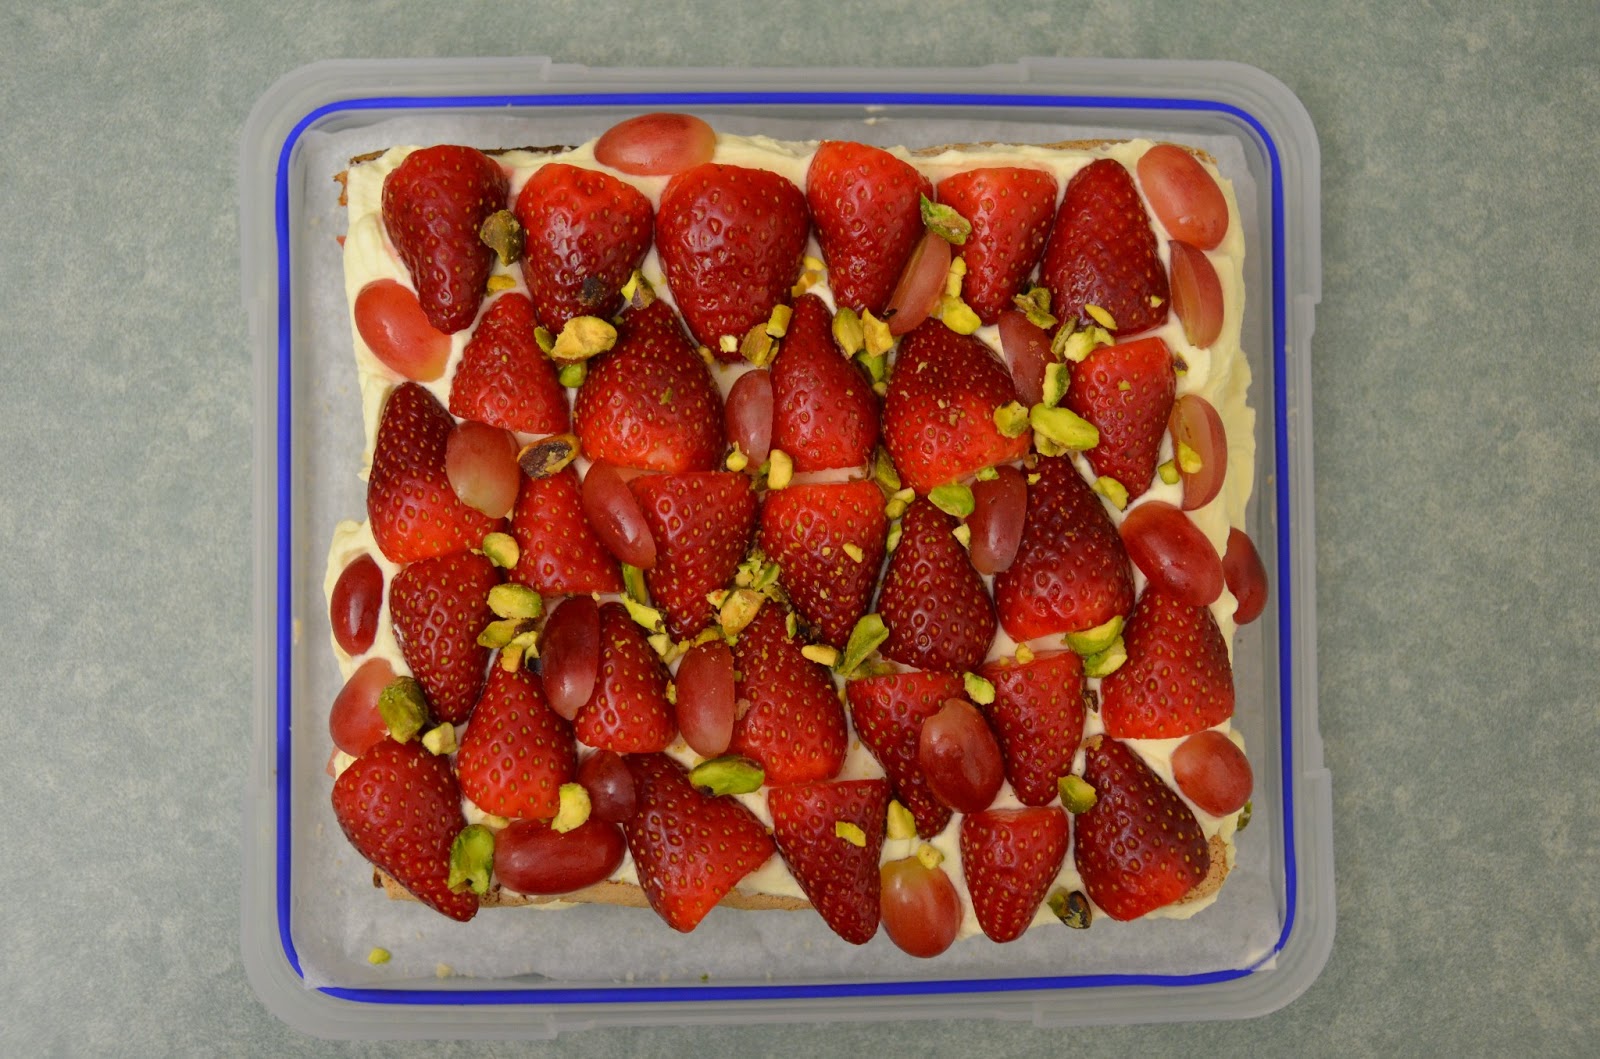
Take out your cake and carefully place the strawberries and grapes.
Scatter the pistachios and then serve.


DONE!

Tip:
- Presentation wise, you could add dried flowers on top of the cake which you can find in David jones food halls.
- You could also trim the side of the cake, to give you a neater look.
- If you are making this cake for an event, freeze them for a couple of hours before the trip to the venue, so that you do not have to worry about this cake flop to the side.

That's it folks!

Until next time,


Tania xx

DIY: How to Make Rosewater

Hello there!

Rosewater can be used for variety of uses, from toner for your skin to cooking! The smell is so divine you can use it in your cosmetic or perfume as well.

I will show you my version of how to make your own Rosewater.
Basically, you will need distilled water and roses.
If you do not have any distilled water, this tutorial also shows you how to make your own distilled water. (Start from step one)
However, you can purchase the distilled water from the supermarket. (In that case, just jump to step five)

What you need:
- Medium sized saucepan (filled 1/3 with tap water)
- Bowl that fits perfectly inside the saucepan
- Lid that is bigger than the saucepan you are going to use
- A Lot of ice cubes
- Spoon or kitchen pipette
- 4 stems of Roses (Preferably red roses)
- Patience

So, lets get to it!

Step one:

Set up the water filled saucepan, bowl and lid (upside down) as shown in the picture below. If possible, pick glass lid without a hole.
Bring the water to boil.


Step two:

Place the ice cubes on the lid and wait for it to melt.


Step three:

While waiting for the ice cubes to melt and distilled water in process, peel the rose petals off the stems and wash them. Make sure you get rid of the dirt, bugs or pesticides.
If you have your own roses plant in your back yard, pick them a few hours after the sun rises so there is no morning dew left behind.


Step four:

Go back to your saucepan, use the spoon/kitchen pipette, take the water of the lid and make sure it does not drip into the saucepan (in my case, because I have a hole on my lid, I have to keep an eye on it every several minutes)

Depending on the amount of rosewater you need, keep adding ice cubes on the lid until you have desired amount of distilled water.
The idea of this set up, as the water boils the steam will rise and hits the cold lid (because of the ice cubes), thus it will condense and flow to the centre of the lid and drips to the bowl.


Step five:

Pick up the bowl inside the saucepan and pour the distilled water into another saucepan (smaller).
Put in your washed rose petals.
The distilled water should barely cover the petals.
If you bought the distilled water off the supermarket, you only need 3/4-1 cup of distilled water (for 4 stems of roses).
Put it on simmer for 10-15 minutes with lid until the rose petal lose their colour.


Step six: 

Remove the saucepan from the heat and strain the petals from the water. 

TA DA! You have yourself a homemade rosewater!

I used my rosewater to make strawberry and watermelon cake (here), do not forget to check them out as well. 

Rosewater: Middle

Thats's it folks!

Until next time, 


Tania xx

Friday, June 14, 2013

DIY: Easy Fresh Flower Crown

Yes, I'm sure you've seen it somewhere at that place when you bought your cute skirt, when you search wedding dress on google, on that mannequin's head when you walk along Oxford street, or wherever you go.

A lot of bloggers made it, show it, wear it, and even sell it. There are million ways to assemble flowers and any other components into a headpiece.

In this post, I'm going to show you how I make my simple version of flower crown/headpiece.


Thin-stemmed flowers 
What you need
 What you will need:

  • Wire - 1.25mm x approx 35-40cm (Bunnings
  • Green Cloth Tape (Bunnings
  • Scissors
  • Pliers 
  • Fresh Flowers 
  • Brown rope (not shown) 
Tips: 
  • When it comes to picking your flowers, you can choose any colour and size. Preferably not too big depending you the size and shape of your head. But, of course, you can go the other way. 
  • Medium flat-faced flower will works better when it comes to placing it on your head in certain arranged set below. (probably not going to work with lilies or big peonies). 
  • If you don't have wire and cloth tape, you can buy the ready-wrapped and cut wire from Riot Art & Craft for AUD$2.99 (20 pieces of 18inch wire)
  • You can get rope from craft store, not to thick, and don't pick bright coloured rope (unless you want it to shine)
Step 1:

Measure it!
Measure the wire on your head, the way you want it to sit. 
Twist the rest of the wire around at the back, and make sure nothing is pointing out (Hazard alert). 

Step 2:
Wrapped wire
Wrap the wire with the green cloth tape. 
Tip: Start from the back of the wire all the way around back. 

Step 3:

CHOP CHOP
Get rid of the leaves and cut the excess stem, it is easier to work with shorter stem. 

Step 4: 

Stick them together
Hold each flower stem 90 degrees against the wire, and cross tape them. 
Next stem, don't forget to give space between its petals, you don't want to squish them together. Yet, you don't want to give too much space. As long as the petals touches each other slightly, you good to go. 
Every 3 or 4 stems, add the smaller flower here and there. 

Step 5: 


Tie the rope from one end, work your way around through the stems to the other end. Just to make sure they won't get loose. 

DONE!

Model: Encrusted Gems

So, that's it folks!

Until next time,


Tania xx